


Summary
This approach discourages riders from entering corners at high speed and high lean angles. The aim is SIFO – ‘slow in fast out’.
You enter corners on a closed or light throttle. You are at a steady speed and a modest lean angle. You can turn tighter towards the apex when you see it’s safe.
When you can see a clear exit, turn tighter and briefly increase your lean angle to turn the bike. Pick the bike up again on a smooth, continuous throttle after the apex. This minimizes the chance of a slide or high side.
If you’ve misjudged the radius of the corner, or your entry speed, you can instantly just turn tighter earlier. You can also do this if you meet an unexpected hazard. Or just stay wide for longer if it’s safer. You have options and escape routes.
Use the rear brake if you need to. This will allow you to slow and turn even tighter, as a last resort, but it needs to be applied gently, and reduced as your lean angle increases.
Introduction
We are responding to the MCIA’s call for a new approach to motorcycle road safety. We have posted on ‘Braking‘ before. This seems to be the priority issue.
The second problem is ‘Cornering‘ on the roads. Riders can lose control on corner entry. They can also lose control mid corner and crash. On exit, the rear wheel can slide. This can cause a potential ‘High Side’ that throws the rider into the air. Alternatively, they might just run off the road.
66% of fatalities are on rural roads. 58% of crashes are reported as not occurring at junctions.
I started as a RoSPA volunteer civilian accessor for BikeSafe in Lincs. The police told me that they get over a dozen biker fatalities in Lincolnshire on corners every year. Not because riders were speeding, but that they were apparently unable to make the corner, panicking and crashing.
I’ve ridden on the road, cornering like this since I started racing in the early 90’s. When I did BikeSafe in 2008 I expected to be criticised for it. And again when I did my RoSPA training and their Advanced Instructor’s course. And again when I had my DVSA riding test to become a Post-Test Trainer. No one ever has. (My ACU Road Race Coaching assessment wasn’t a problem either).
I am sure many others ride like this. But many don’t, having trained over 500 road riders in the last few years.
The advice is ‘Slow in Fast Out’ – ‘SIFO’
Background
We organized a classroom session and an on-road training course on cornering in 2010. We had been delivering RoSPA ‘RideSafe’ courses for 2 years, subsidised by Notts CC.
Rupert Paul from BIKE magazine joined us, and gave the day an encouraging write up. The drawing below then appeared in his book ‘Pass the Bike Test and be a Better Rider‘.
This is ‘squaring off’, made popular by Noriyuki Haga 25 years ago. It’s also similar to Keith Code’s earlier ‘hook’ turn for track riders, which is more brutal. (Twist of the Wrist).

We’ve edited it to add the escape zones that this technique provides for riders, which are critical. These zones are available at any point through the corner.
In 2012 we moved to track-based training for cornering, as it was clearly safer, and started ‘The School’.
The Method
- Finish your braking before the corner.
- Select a lower gear before entering if appropriate.
- Keep your foot just over the rear brake.
- Set your speed so you can turn more tightly when you can see the road is clear.
- Use a light or closed throttle.
- Enter the corner on the outside of the bend for the best view – if it’s safe.
- Look through the corner and turn more tightly towards the apex, when you can see your exit line is clear.
- Roll the throttle on smoothly after the apex, to pick the bike up
- Take as much of your lane as is safe on exit.
You always have the yellow ‘escape zones’, at any time.
If you like leaning a bike, then this is your opportunity to do it safely. You can run as deep into the corner as you want. You can turn as late and as sharply as you want (within reason).
(You actually do this automatically by pushing on the inside bar – counter-steering).
Try and keep your head horizontal, but lean your body with the bike. It’s your eyes that contribute most to balance.
Accelerating on Exit
You need to be careful when applying the throttle on exit. A ‘High Side’ is more likely on the road due to a poor surface. You could run wide and off the road. Or into oncoming traffic even if you have traction control.
Always roll the throttle on steadily, as the revs build up. If you do lose traction, the bike will slide to the side. You should be able to correct it. You will snap the throttle shut automatically. The wheels should come back into line.
If you have the throttle pinned, the revs will rise instantly. This happens if the tyre loses grip. The revs may even hit the rev limiter as the engine climbs up the power curve. The bike will slew violently sideways. When you shut the throttle, the tyre will dig in, flipping you off the bike and into the air.
You could rely on traction control if your bike has it – but I wouldn’t. The danger is you’ll come to rely on it, and come unstuck on a bike that doesn’t have it. You’ll never learn to ride properly. On earlier bikes we’ve found it won’t necessarily stop a fall at high lean angles, but should prevent a ‘high side’.
If you have traction control, then on the road consider setting it at least one below the ‘race’ or the lowest setting. Like the ABS coming on, regard any activation as ‘rider error’.
Personally I never trust computers. When we went from analogue to digital in the last century, we were assured there would never be any errors…. It would either work or not.
God help us with AI (which is usually ‘machine learning’ – they’re not that bright).
Gear Selection
Consider changing gear before entering corners. Don’t be lazy.
Most rural corners are best taken in 4th gear on larger bikes, although you may need to go down to 2nd or even 1st just before a hairpin bend.
This gives you tighter control and a better drive out.
You can pull the clutch in and blip the throttle, matching the gear and revs with your road speed as you’re changing down. (Sequential down shifting). This makes life easier on the clutch and gearbox. It was also essential when racing, before slipper clutches, to avoid locking the rear wheel.
You don’t need to do this if you have a slipper clutch. But do it anyway as you need the skill to ride bikes that haven’t. And it saves wear on the clutch. In any event, always let the clutch out slowly to avoid locking the rear wheel.
You brake with your left two fingers and blip the throttle with two outside fingers.
It takes some practice to get right, but it is very satisfying. And makes some more noise for those of us with louder exhausts. (My old KTM also pops and bangs rather satisfyingly on the overrun).
It’s also ‘good practice’ to do this when you’re slowing at junctions too, if done properly. It assures that you’re always in the most appropriate gear.
Yes, I know you were told to ‘block change’ as you came to a halt. It’s simply easier, but poor practise.
You may need to accelerate briskly away from a hazard, which you can’t in a high gear at low speed.
Rear Brake
It is sensible to have your foot ready over the rear brake. Press steadily down if you want to reduce speed at any time in an emergency. This will also allow you turn even tighter if you need to. You’ll need to steadily release it as your lean angle increases to avoid skidding.
Bear in mind engine braking will also be working alongside the rear brake. A big twin or single with higher engine braking will have more effect. They will have more effect than a large 4-cylinder bike.
You should be able to brake quite firmly up to around 24 degrees of lean (0.4g grip). This will vary dependent on machine, tyres etc. Leaning further will need you to gradually release the rear brake, to avoid a lock up. This is rear brake only!
Using the rear brake also transfers some weight onto the front tyre, sharpening the steering and providing more front-end grip. This will also help to tighten the turn.
Front Brake
Avoid using the front brake in corners as it straightens the steering and stands the bike up. And a front wheel skid usually results in a fall. However, a rear wheel skid, can usually be recovered if the rider releases the brake.
You can use the front brake, but only in an emergency, leaving it on as you turn in. The bike will resist turning, and try to stand up, so you will likely run wide. Doing this routinely as racers do, puts riders at very high risk, due to faster corner entry speeds, a variable road surface, and no safety margin.
If you try using the front brake mid corner you will likely skid and fall, or the bike will stand up and run wide. The official advice is only use it if you have space to stand the bike up, brake and run wide. The problem applying the brake mid corner, as opposed to trailing it in, is the lack of weight and grip on the front tyre. So it needs a very gentle application and great care, or a skid and fall is very likely.
Using just the rear brake is safer.
Hopefully this method will avoid riders having to learn by experience (trial and error). It’s painful, usually involves visits to A&E, and lots of bits of broken coloured plastic – from experience.
This is the basis of cornering lines from our track training courses, on which the advice is based.

The advice is to consider using the green line.
The red line shows what happens when you turn in too early.
The yellow line tends to be the usual ‘fast riders’ line. The bike is at maximum lean for most of the corner. No room for error. No safety margin. You’re committed from the point of entry.
Cornering Issues
From experience, there are 4 main problems when cornering, which this method seeks to address:-
- Misjudging entry speed – in too fast.
- Turning in too early.
- Taking RH corners leaning into the oncoming lane.
- Failing to spot a hazard on the road surface, or having to avoid other mid corner hazards.
Misjudging Entry speed – in too fast
Problems with corners often occur because riders misjudge their entry speed. They find the bend is longer, or tightens mid-corner. They try to brake and fall. Or simply panic and run wide.
There is a good section on judging entry speed using the ‘Limit point’ or ‘Vanishing point’ in Police Motorcycle Roadcraft. It is the furthest point of continuous tarmac you can see. A road hazard may be hidden in a dip. You might also be misled by looking at hedges, fences, telegraph poles, etc. You could wrongly assume they follow the road. Sometimes, they don’t.
There is one local junction where two riders I’ve trained ended up on the grass verge, luckily without falling. The hedge line is misleading, and the bend is on the brow of a hill at a junction.
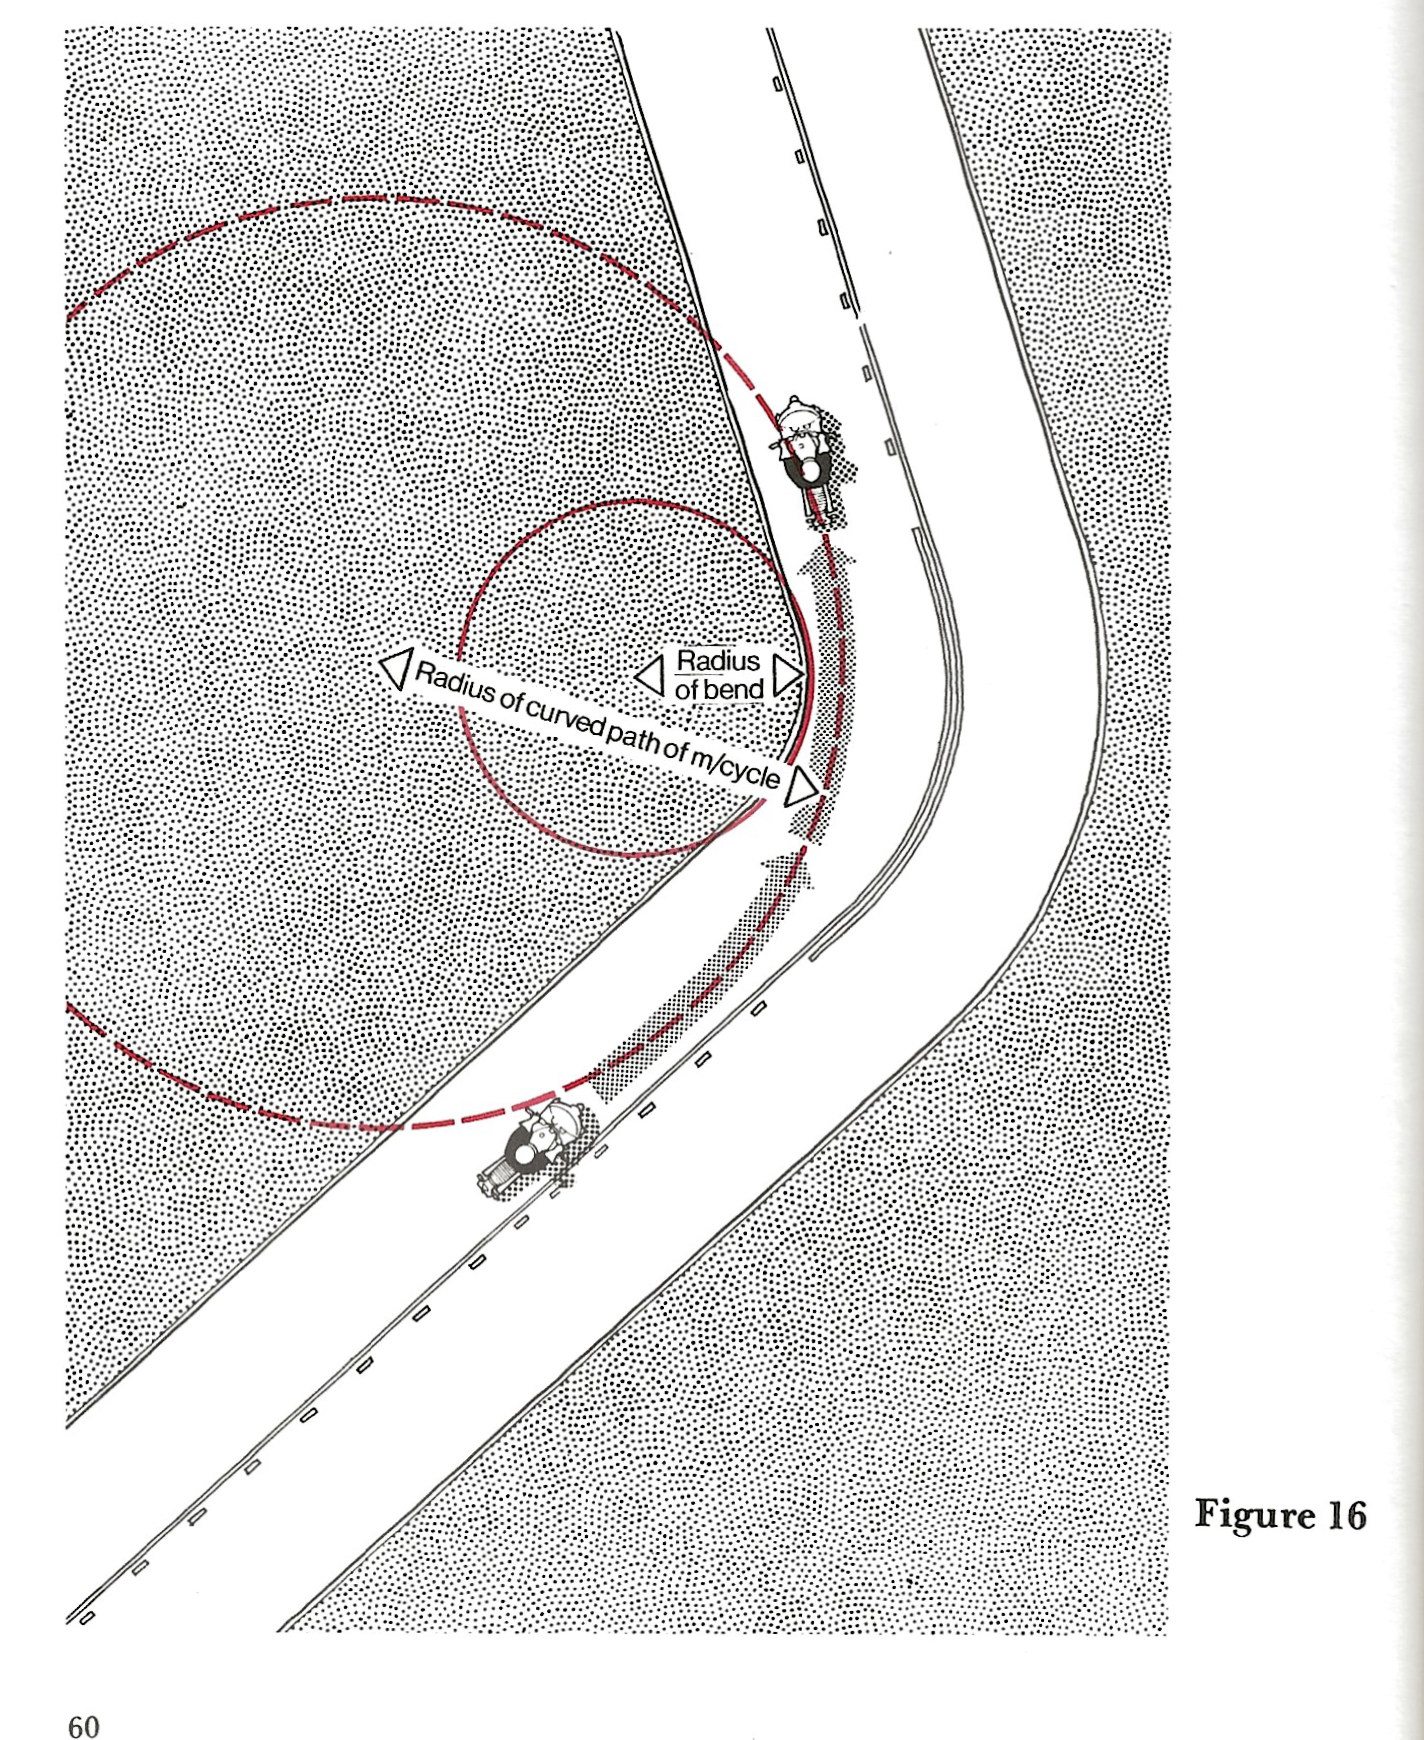
The limit point starts to move around the corner as you approach it. With practice you can use this to judge the tightness of the bend and set your entry speed.
There is a tendency for some riders to want to go around corners as fast as they can. They assume that the faster they go in, the faster overall they will be. Wrong.
We see this on-track all the time.
We’ve nearly all been too enthusiastic at some time or another, or been caught out through not paying attention.
With this method you are already entering at a speed intending to turn in more tightly. You can do this when you can see the exit is clear. So a tightening bend, and most hazards, should be avoidable.
Turning too early
Turning in too early can lead to running wide on exit. It’s a problem both on road and track. It can also be a panic reaction when riders feel they are going too fast. Or due to a lack of confidence that the bike will turn in time.
The rider then cannot turn in as they are too close to the inside kerb. Or too close to the centre line on RH corners. Their view is also restricted.
As the bike gets to mid corner, it then starts to run wide, heading towards the scenery. Or across the centre line, possibly into oncoming traffic.
The rider now has to turn more sharply to stay in the lane. This is after they should have apexed and accelerated away. Dependent on speed, ability, luck and confidence, they may be unable to.
Leaning across the centre line on RH corners
The suggested method allows you to lean over into the opposite lane only when you can see it’s clear. But it’s safer to keep all of you and your bike in your lane. Never cut corners by riding over the centre line. It’s too risky generally and tends to become a dangerous habit.
If you are leaning into the incoming lane and a vehicle suddenly appears, you will be at serious risk. You have to immediately bring the machine upright, and then lean it back over again. There may not be sufficient room on the road for this.
If the rider tries to turn the bars to the left away from the oncoming vehicle, which they may do in panic, the opposite will happen and the bike will turn tighter into the oncoming vehicle (counter-steering).
Even if the rider has avoided the vehicle, they are still left heading towards the scenery. This will usually require the rear brake to be applied. You then need to get the bike back over again.
The alternative, only when the bike is upright, is to apply the front brake smoothly. If there is enough space to stop.
Best keep within your lane?
Failing to see a Hazard
This can be a simple lack of attention. Or an unexpected hazard – pot hole, gravel, mud, diesel, oncoming vehicle cutting the corner, etc. etc.
Sometimes surface hazards are not obvious until you get close. A pedestrian or vehicle can also appear ‘from nowhere’. A horse may be just out of sight. A dog. A deer. A scaffold board from off a truck. An oncoming vehicle may cut the corner or run wide.The list is nearly endless.
It’s the ‘unexpected’ nature of the hazard that is often the root cause of crashes.
The suggested method should allow you to change course quickly to avoid hazards. You have options. Both ways. You will probably be in, or close to, the RH or LH car wheel track, which tend to be clear of debris. But you may have to avoid turning tighter towards the apex and stay wide if there is mud etc mid lane.
Or you may have to turn tighter earlier to avoid a hazard on your path. You are planning to turn tighter anyway.
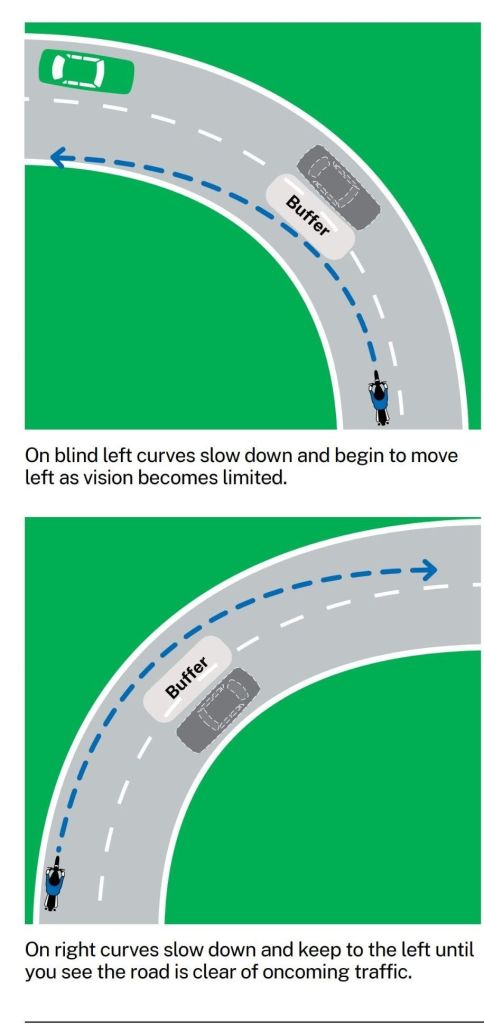
Below are two illustrations from the New South Wales Riders Handbook regarding oncoming vehicles.
If you’re in the habit of entering corners as fast as you dare, you will have few options.
Leaning the Bike
Many riders are worried about leaning the bike, and the tyres losing grip and sliding.
On a fairly decent road surface, you can usually lean the bike to 45 degrees safely, with a 30% grip safety margin. 55 degrees is probably the limit for most bike and tyre combinations – (not cruisers which can deck out at 25 degrees).

In an emergency, you can probably lean the bike until something scrapes. This is usually the footrests, which are designed to hit first as a warning. They then fold up to prevent the wheels from being lifted off the ground. Many have ‘hero blobs’ under the footrests that scrape first. These can be replaced.
When you lean far over for the first time, many riders seem to confuse the suspension sinking under the centrifugal force, with the tyres sliding. We’ve often heard riders saying they ‘lost the rear’, when it was just the suspension compressing.
However, it’s not sensible to habitually ride at steep lean angles. 35 degrees is probably the maximum for the road, giving you a good safety margin.
If you’re not confident of leaning the bike, you are at high risk.
Don’t Panic
There are two usual mid corner panic reactions.
The first is to hit the brakes. If you snatch the front brake, you will likely skid and fall. Even if you have ABS, if you squeeze the front brake, then the bars will twist, sometimes violently. The bike will sit up and run wide.
If you stamp on the rear brake it will also likely skid and you may fall. However, with ABS or gentle pressure the bike slows allowing you to turn tighter at the same lean angle.
The second panic reaction is to think the bike is falling inwards or sliding, and the rider jerks the handlebars into the corner to bring the bike up. Again, you will run wide.
If you find yourself going too fast, or needing to turn tighter, just look where you want to go, not where you don’t. Press gently on the rear brake and push on the inner bar to counter-steer the bike into the corner. Practice this carefully until it becomes automatic in an emergency.
Official Guidance
There is a lack of diagrams from the DVSA, or in the latest Police Motorcycle Roadcraft. In the 70’s version, this was simply the largest continuous radius back to the centre of the lane.
But look carefully, and you’ll see the danger if the bend is longer than you thought, or tightens. You’ll have to brake or run wide over the centre line, or through the scenery.
Maybe this was why it was dropped?

If you use the suggested method, you simply stay wide at a slower speed until you see the exit. Then turn tighter and accelerate away. Your maximum lean angle is for a short duration at the apex. Not all the way around the corner.
The main difference is the faster rate of turn just before the apex in our suggested later turn in. You can do this simply because frames are stiffer, steering geometry more radical. Tyres are far grippier and engines far more powerful. You can be back up to the speed limit in a second or two.
Maintaining higher corner speeds, which was the best route on older slower bikes when maintaining speed was the aim, is still used in the lower capacity racing classes.
An old DVSA videos shows the ‘Wall of Death’ line, around the outside of the corners, again leaving little room for error.
Check your Lean angle
You can check your lean angle using a phone App or a data logger. We use the KurvX system, which displays your maximum lean angle shortly after the corner. The display goes to red if you’ve leaned over 35 degrees.
You can then play back your route and back check your lean angles on corners, which are colour coded. Best to stay out of the red on the road.
This is a few steady laps at Cadwell Park, but it’s also useful to be able to check your road riding. Really useful feedback for training on road or track.

See also:-
Feedback, good or bad, welcome.
Mike@britishsuperbikeschool.co.uk
Mike Abbott, British Superbike School, 14.1.25
