This is a short summary from a number of proposals from MAG, BMF, MCIA, NMC etc.
A link to the Government paper is below, while consulations continue.
Simplified Licensing:
Lowering age thresholds for A1 (125cc) and A2 (35kW icenses, potentially from 17 to 16 for A1, and from 19 to 18 for A2,
Training Focus:
Moving away from repeated CBT renewals towards a more progressive “CBT Plus” system, ensuring skill development
Assessment Over Testing:
Replacing some tests (like Mod 1 & 2) with practical assessments, potentially after two years on a license, for upgrades.
Direct Access (DAS):
Reducing the Direct Access age from 24 to 21 for a full A license.
E-Scooter Integration:
Introducing a new license category for e-scooters and small electric vehicles for 14-year-olds.
Why These Reforms?
High Fatality Rate: Motorcyclists are disproportionately represented in road deaths (21% of fatalities for 1% of traffic)
Complex System: The current system is seen as complicated, hindering access.
COMMENTS
Overall, very welcome and sensible, making PTWs more accessible, along with parallel changing in training.
Emergency braking from 60 mph needs to be included in training and testing for A1 and above.
All commercial motorcycle training needs to be regulated, as with all other vehicles. Excepting only the most hazardous form of transport from regulation and oversight makes no sense.
Very worrying to see step on E-Scooters included, not banned, despite >50 mostly avoidable deaths and probably >1,000 avoidable serious injuries, and damming reports from TRL and WMG commissioned by the last government. Common sense needs to prevail here.
E-Scooters are flawed by design, take twice as long to brake than the Highway Code standard, cannot mount a 100mm kerb, cannot carry shopping safely – a back pack makes braking more difficult and hazardous. They also use more energy than an E-Cycle which you have to pedal, which can achieve standard braking distances, carry shopping safely and mount a standard kerb, and have a greater range.
Fatal collisions start at only 9 mph, although a simple fall can be enough.
E-Cycles would be 300% safer according to the research. Adding trigger throttles avoids having to pedal, and would allow riders to ride cover their brakes at all times, like cyclists, reducing reaction times by circa 1 second, potentially avoiding many collision or achieving a 10 mph reduction in impact speed (No need to close a twist grip throttle before braking).
(Please note this differs from official DVSA or Police Motorcycle Roadcraft advice – if in doubt refer to ‘Riding – The Essential Skills’ and follow that advice).
Consider riding with your foot over the rear brake pedal and two fingers resting on the front brake lever whenever you can. This potentially saves 1 second in applying the brakes, which can make a significant improvement in outcome during a crash. Bear in mind it’s usually ‘the unexpected’ that will get you.
Always consider covering your brakes in response to any potential hazard, by placing your index and middle finger on top of the front brake lever, resting your foot on the rear brake pedal. Extend your your left hand index and middle fingers on top of the clutch lever.
If you have to brake suddenly, roll your hand forward closing the throttle, wrapping your fingers around the lever and squeezing, don’t snatch, the front brake lever applying increasing pressure.
If the wheel locks, immediately release and reapply more gently. At the same time pull in the clutch and press down steadily on the rear brake with increasing pressure, and again release and reapply more gently if the rear wheel locks. It will need to be gradually released as the weight transfers forwards and the grip reduces. Just initally dabbing the rear brake is an alternative, which needs less thought still.
You may not be able to fully close the throttle, and the engine may be screaming, but it’s not important – stopping is.
The front brake is by far the most effective brake, so focus your attention on it and front wheel grip.
If the ABS comes on, keep the brakes applied and let the system bring you to a stop. Only release some pressure if the bike tips up violently and the rear wheel leaves the ground.
Braking hard from speed is similar to doing a handstand for a few seconds whilst adjusting the brake pressures, and steering, balancing, trying to keep the machine straight.
It needs practice.
Introduction
These recommendations are based on basic theory and common sense, and minimises braking distances (Cossalter).
As a rider, if you think you will instinctively brake effectively in an emergency – please think again. You may be mistaken.
Forensic crash investigators have found that circa 50% of riders skid and fall trying to brake in an emergency.
Research has also found only 50% of riders can achieve Highway Code braking distances. With training and practice, many riders can stop in 80% of these distances. Braking effectively can easily be the difference between braking in time, and a serious impact.
You will likely be unaware of these figures, although the research is over a decade old. In some areas the police and others have been addressing the problem. Locally the Lincs police were running courses at Cadwell Park covering emergency braking with Hopp Rider Training. There are also other initiatives that we are aware of.
The problem has been hidden by the inadequate accident investigation system used by the police. They will likely be aware of the problem due to the evidence at the scene where a rider has fallen and slid into a vehicles at ground level, and the scrape marks on the road. There is no specific cause of ‘fell whilst braking’. It’s swept up in ‘Loss of control’ which isn’t particularly helpful. In addition, the failure to brake properly will likely be hidden as it may be unknown.
So this cause will likely end up being misreported in addition as ‘speeding’ or ‘failed to look properly’. There are correct diagnoses of speeding, where the injuries the rider sustained show that the impact was at above the speed limit. But the figures are probably misleading, not helped by a recent survey using traffic cameras that motorcyclists are more likely to be speeding than other road users.
We are often seen as reckless, and our own worse enemies, with some justification.
It is clear that National and Local Government is not currently interested in PTW safety. The reckless stupidity in continuing with E-Scooters despite >50 deaths, and >1,000 serious injuries, and the official findings that they are 5 times more hazardous than a bicycle.
We’ll have to help ourselves.
Official Advice
None that I can find suggesting covering the front brake – but I might have missed it. I know it’s considered by some to make snatching the brake more likely, so it may have been deliberately ignored. I have seen no evidence to support this. With modern ABS it would make little difference, based on our recent tests with KurvX dataloggers.
DVSA
The current DVSA advice is to close the throttle. Then apply the front brake before the rear. This makes no sense. Applying the rear brake as you are closing the throttle turns on the brake light probably 1 second earlier. This can be a life saver, as riders are very vulnerable to being struck from behind. You’ve also started to brake, which makes an even bigger difference with linked brakes.
POLICE MOTORCYCLE ROADCRAFT
Closing the throttle first is missed (it was in the 1990’s DSA riding manuals as well). It’s advised that you release the front brake and apply the rear as you’re coming to a halt. This looks to have been mistakenly carried across from normal braking.
Emergency Straight-Line Braking
This assumes you have ignored the advice above, and are not covering the front brake.
If either wheel locks, release that brake immediately and reapply with less pressure.
If the rear wheel lifts off the ground, release some front brake pressure to stop the bike tipping forwards.
Disengage the clutch as you come to a halt
When banked in a corner, just carefully apply the rear brake.
Dry Roads – the advice is 10% rear brake and 90% front
Wet Roads – 30% rear and 70% front due to less grip.
(Vittore Cossalter – ‘Motorcycle Dynamics’)
Emergency Braking in a corner
Be Prepared
You should consider rolling off the throttle at any time in response to hazards. Cover the front brake with your index and middle finger. This will reduce your reaction time and braking distance significantly. You can then apply both brakes at the same time.
Riders of classic bikes with cable brakes should be aware of the risk of their little finger and ring finger getting trapped between the lever and the bar. This can happen due to cable stretch. So they should use all 4 fingers. Riders need to check there is clearance on all machines so their outside fingers won’t get trapped by the lever.
This could save circa a second or more in front brake reaction time in an emergency. It makes locking the front wheel less likely, as the rider starts with two fingers near the pivot. They can then be joined after by two more fingers further away, which can offer more power if needed.
Consider lightly touching the rear brake to operate your rear brake light if there is another road users close behind in hazardous situations. Watch the front wheel of cars at junctions for the first sign of them pulling out in front of you.
Consider riding while cruising with two fingers (index and middle) resting on top of the front brake lever. This lets you apply it quickly if needed. You will also close partially at least the throttle as you stretch your fingers forward to grasp the lever (not automatics without a clutch).
However, dependent on the design, it can make it difficult to fully shut the throttle. Pulling in the clutch smartly will ensure it doesn’t affect braking. Yet, it could leave the engine racing.
This should significantly shortens braking distances as the front brake is applied immediately. However, if you haven’t practiced, the front brake might be snatched. This needs to be balanced against stopping far more quickly.
Research has shown emergency braking competence is not related to rider experience. If riders are not taught properly, many will probably never be able brake properly, putting them at high risk.
Practise Using a Phone App
You can use a free phone App such as iAccel Lite to test your braking ability. It shows initial speed, distance to stop and average braking g force, which should be 0.67g minimum to meets Highway Code braking distances. The theoretical limit is 1g after which most bikes will start to tip up. The best riders can stop in 80% of the published distances.
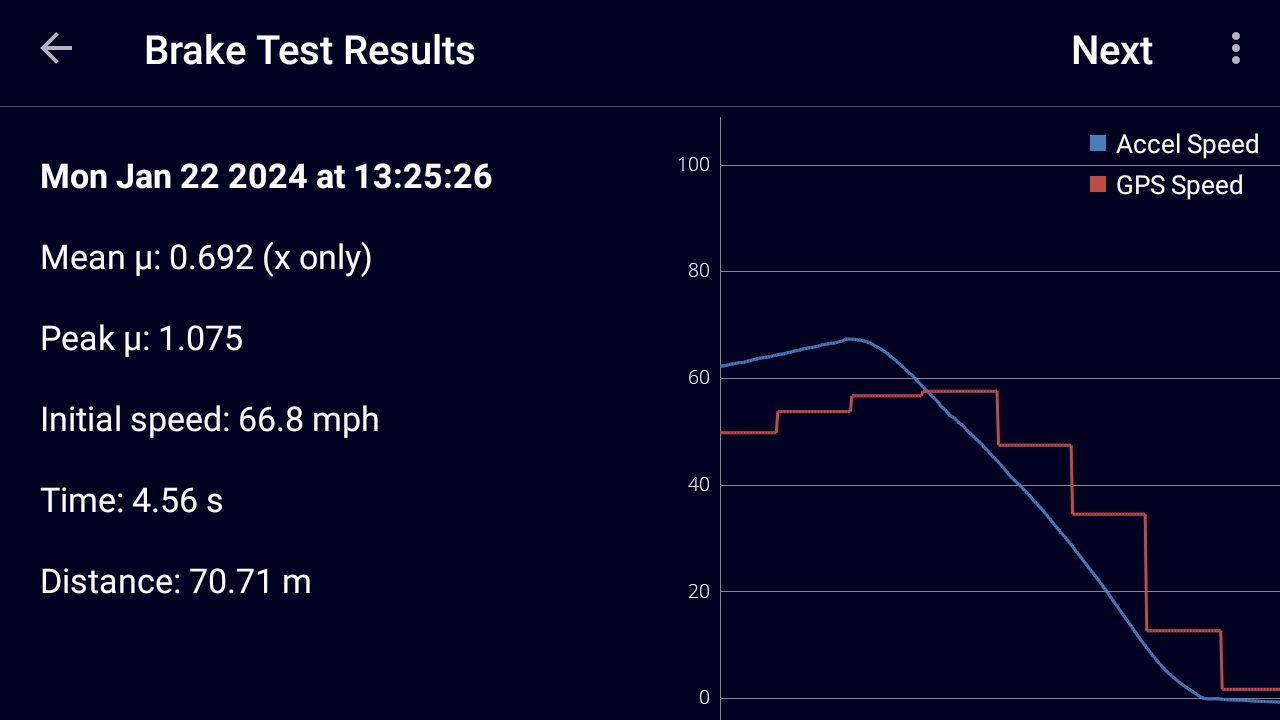
PRACTISE USING A DATA LOGGER
These are graphs from a KurvX datalogger from a test day at Blyton Park. The Kurvx system can also be used for cornering feedback and training.
This has the advantage of being able to see the braking force applied by the rider through the braking cycle, and where improvements can be made. You can see from the second graph that the rider failed to apply the brake hard enough initially.
Practise, Practise, Practise
If your bike doesn’t have ABS, do not practice alone due to the risk of falling.
It is vital that you practice emergency braking repeatedly to create the required ‘muscle memory’, so your response become automatic. This should avoid an uncontrolled panic reaction, which currently means circa 50% of riders in an emergency lock the front wheel , skid and fall.
Even with ABS, many riders can simply fail to apply the brakes firmly enough, usually due to previous or current experience on bicycles.
If the ABS activates, the rider has braked too hard, or more likely initially too harshly. There is no evidence that ABS actually minimises braking distances, although it is a vital safety aid.
If the ABS does activate, releasing and reapplying the brakes will probably increase the braking distance.
We’ve tested the latest ABS technology, and it’s far better than it was. You can brake with the tyres screaming. But it’s better that your technique doesn’t activate it. You may ride a bike without ABS in the future, and will need the skills.
Gradually build up, braking harder as your confidence grows, always ready to release the lever immediately if the front wheel locks. Once the forks have compressed, and the weight has transferred, which probably takes around a second, you can usually squeeze the lever as hard as you can without the wheel locking.
In theory it takes 200 repetitions, after which the memory and reaction becomes permanent and automatic. This is easier to achieve safely and quickly on a track.
As most of the speed is lost at the end of braking, the difference between the best and worst rider as tested, is the difference between stopping in time from 60 mph, or a 40 mph potentially fatal impact.
Most track riders and racers already have this built-in, as it only takes a day’s racing or a trackday for this to become embedded into the rider’s behaviour.
If you change your bike, consider practicing again, particularly if it is an older machine without ABS.
Why this sequence?
It’s important to brake as quickly and hard as possible to avoid collisions or minimise impact speeds.
The rear brake should be applied first (or together with the front brake if you can). This is because the rider’s foot is usually positioned directly above the rear brake pedal. The foot can also be slid forward and down in a single movement.
This operates the brake light immediately while the throttle is being closed.
Applying the rear brake also compresses the rear suspension, lowering the centre of mass. This will allow the front brake to be more effective. What limits a motorcycle stopping is it will tip up.
The rear brake usually only provides only around 40% of braking. It’s important to apply the front brake as soon as you can.
The rear brake starts the braking process right away. It also initiates the crucial weight transfer onto the front tyre. This maximizes the braking. This makes locking the front wheel less likely. It also squats the machine down, lowering the centre of mass which also helps.
On bikes with linked brakes, this also activates the front brake, giving you circa 70% of the available braking.
The front brake initially provides about 60% of braking. This can increase to 100% as the weight transfers forwards.
The best ration of front to back braking is probably circa 90/10 for most machines. This keeps the bike lower, allowing it to stop more quickly. 70/30 in the wet as there is less grip.
Applying the rear brake first means the bike is already slowing as the rider reaches for the front brake lever. This probably takes circa 0.5 seconds = 44 feet at 60 mph.
The rider should be prepared to immediately release the rear brake if the rear wheel locks. This is not vital unless the machine slews to the side. The situation differs with linked brakes and the style of machine. Notably, cruisers have a more effective rear brake. However, the basic advice is the same for all types of motorcycles.
At the same time, the rider needs to sit up and release the throttle. They should extend their fingers and grasp the front brake lever. Next, they must straighten their arms. Then, apply steadily increasing pressure to the front brake lever. This action transfers more weight forward onto the front tyre. It is crucial to do this without losing front wheel traction. This requires a high degree of skill and practice.
Riders need to be prepared to immediately release and reapply the front brake if the wheel locks. This is usually caused by snatching. Riders need to release some front brake lever pressure if the rear wheel leaves the ground. This can happen particularly as the vehicle comes to a halt. This also requires skill and practice to recognise and respond to.
Wet Roads
Wet roads need more care. Apply the brakes initially more gently. Once the weight is transferred onto the front tyre, it is unlikely to skid unless there is standing water. Again, 70/30 front/rear braking is suggested.
Braking Mid Corner
Firstly, the advice, if you believe you may need to brake mid-corner in response to a hazard usually caused by too high an entry speed or a tightening corner, is to simply look around the corner where you want to go, rather than where you feel you might end up.
You should counter-steer instinctively, but can also counter-steer deliberately with practice, pushing on the inside bar. The bike initially falls in the opposite direction to which the steering is turned, helped by the gyroscopic effects of the front wheel, after which the rider will instinctively turn the bars back to stop the machine falling further.
A modern machine with good tyres and ground clearance (not cruisers), can be banked at circa 45 degrees or more on reasonable road tarmac. Many crashes have been caused locally, the Lincs police informed me, on corners when the rider could have got around easily had they had the confidence. If you’re not confident leaning the bike, then get some on-track training where you can practice in relative safety.
Providing the bike is not banked at an extreme angle, there is a surprisingly large amount of grip still available for cornering, braking (or accelerating), or cornering when the motorcycle is banked, which is the combined dark dark and light green area, and the dark green areas respectively, as shown in the diagram below.
This is based on ‘Mohr’s Circle’ theory of grip, and is the theoretical maximum amount of grip. This is affected heavily by a variety of factors, particularly the distribution of weight under braking.
This is based on the 60 degree maximum lean angle that racers can achieve on slick tyres. 45 degrees is a sensible maximum on the road = 1g, in perfect conditions.
Braking mid-corner using the rear or front brake lightly (not both together) could be practiced with great care, for use in an emergency.
Rear Brake
It needs to be applied very carefully, as the weight is transferred off the rear tyre onto the front, so has a double negative effect on the level of grip.
However, the rear brake increases the ability for the bike to turn as weight is transferred onto the front tyre, which is doing the steering. The bike slows, squats and pitches slightly forward, sharpening the steering angle marginally, The rear tyre is likely to slip sideways, which is an old race bike trick for quicker cornering. This is like ‘oversteer’ in a car.
Worse case the rear loses traction and the rider may fall, but it’s usually a ‘low side’, unless the rider releases the brake fully after a wide skid, when a ‘high side’ is possible. But the outcome is probably better than a front wheel skid, as the machine will likely impact first, then the rider, rather than the rider being followed and struck by the machine.
The other alternative of a direct head-on collision with an oncoming vehicle, or stationary hazard, is likely to lead to a worse outcome.
Front Brake
Riders can ‘pick the bike up’ and brake if there is sufficient room and road width, but this tends to be a ‘last resort’. This is often a panic response. This results from the machine being steered more tightly into the corner, which has the opposite effect from counter-steering. Or from applying the front brake when banked, as this pushes the bike outwards (yaw).
Riders can apply the front brake lightly very lightly mid-corner in an emergency. It is potentially more effective than the rear, as most machines are designed with a slight front wheel weight bias. However, it affects the steering, straightening it, potentially ‘sits the bike up’ which can make the bike run wide, which can be more risky. The rider will need to push on the inside bar at the same time, counter-steering to stop the bike running wide. This increases the lean angle so uses up even more grip.
It is an opposite situation from the rear brake. The more front brake, the greater the grip as the weight is transferred forwards, but it needs a very smooth application.
Using the front brake in corners needs very careful training and practice, so is probably best left to professional trainers on a race track, with training and advice to road riders restricted to just looking where you want to go, avoiding ‘target fixation’, counter-steering and applying the rear brake mid-corner in an emergency.
Using the front brake carefully in a corner has potentially the greatest effect, but requires a high degree of skill and practise.
Most racers just use the front brake, but they plan ahead, knowing the bike will understeer and run wide at the limits of adhesion, which is not sensible on the road where you need a safety margin.
Trail Braking
Additional training in ‘trail braking’ into corners in an emergency could be of considerable benefit to riders, which we cover at The School. But it’s an advanced riding ‘failure to plan ahead’.
Racers consistently trail the front brake into many corners. They gradually release the front brake pressure as their lean angle increases, with the brake being finally released sometimes just as the throttle is opened on corner exit.
This leaves virtually no safety margin. It is totally unsuitable for road riders to use as a routine. But it is a useful tool to have in an emergency. This allows the rider to brake hard and turn at the same time. This is particularly useful when a rider has misjudged their entry speed to a corner. Or has to avoid a hazard.
The difference between carrying the front brake into a corner and applying the front brake mid-corner needs to be completely understood. It is crucial to distinguish between these situations. When you enter the corner with the front brake applied, the extra weight is already transferred onto the front tyre, so it already has the ability to produce significantly more grip.
Re-applying the front brake after you have started to turn, leaves the rider with initially only circa 50% of the weight on the front tyre, which is also doing the steering, making a skid and fall far more likely without great care and very careful application of the front brake.
Again, if in any doubt, it is recommended road riders should just use the rear brake when banked.
Always take care, and keep within your capabilities and confidence limits.
As motorcyclists, the problem with young riders is something we are going to have to tackle ourselves. If we want anything to change.
I came across 5 young riders on a single day last week, probably all riding illegally. One had no headlight, 3 were wearing shorts and T-Shirts. Two had proper kit and were riding off-road bikes. Gave me a nod as they passed me on my E-MTB.
If I’d been on my KTM they may well have stopped for a chat.
I trained the Notts police off-road team many years ago, who were very successful in tackling the off-road riding problem. But that is not where the problems mainly are. It’s on road. Off road riding really is just a nuisance – mainly noise, and complaints from land owners. Tractors do far more damage.
So what can you do?
Firstly discourage your youngsters from riding a motorcycle if under 16 years, when they can do their CBT. An E-Cycle or E-MTB can be legally ridden from 14 years. Good chance to learn braking and handling skills – and the use of disc brakes and suspension movement.
They can race mini motos etc. and off-road, but it’s expensive. There are facilities in some areas where they can ride, but sadly they are rare. There is no national equivalent of ‘Young Drivers’. There should be.
Personally I’ve never had a problem talking to young riders. Never had any abuse.
Motorcyclists come from all walks of life, sharing a common interest. If you breakdown roadside the next biker along may well stop to help.
The Problem
In 2022, in the 14-16 young rider age group:-
115 KSIs in total
60 were underage
55 were riding 125cc machines illegally
In 2023, in the 17-20 year old group:-
36 young rider fatalities
50% higher than the 24 fatalities in 2019
Double the number from 2020, which at 18 fatalities, was probably affected by COVID 19.
The extent of the problem seems to be a well kept secret.
The Main Issues
Illegal E-Scooters.
Average rider age 16 years.
50 deaths all ages so far. >1,000 serious injuries.
Underage Riders
40% of fatalities. Many others probably had no licence. Proper training is vital.
Upgrading to a 125cc
The risk of upgrading from a 30 mph moped to a 125cc geared bike capable of 60 mph with no extra training.
No legal requirement for more training. The vast majority of KSI’s are on 125’s.
Emergency Braking.
The DVSA advice is wrong. Apply your rear brake immediately. Do not snatch the front brake lever, or stamp on the rear brake. Apply the brakes steadily. Practice.
Consider riding with two fingers on the front brake lever and clutch, and just squeeze both in an emergency. This should save you >1 sec and critically should reduce your impact speed by around 15 mph or maybe avoid an impact altogether. You’ll probably survive a 30 mph crash, but not at 40 mph.
A New Approach?
I started again, this time with pre-teen riders and Bikeability, who are supported by the Dft.
We already know that there is a serious problem with PTW braking, so I asked them how they teach braking to young cyclists.
Received an immediate response. Somebody cares.
They are taught to ride covering their brakes, how to brake progressively, and particularly to avoid snatching the front brake. Perfect.
So moving to a motorcycle, the skills are immediately transferable.
The question is then why are PTW riders not taught to cover their brakes, and why is PTW braking so poor?
Bikeability cover 44% of younger riders who should be more open to accepting advice before they become teenagers. Braking skills can be embedded more easily with younger riders creating ‘muscle memory’.
There is now also a ‘halfway house’ with E-Cycles from 14 years, which they also cover, many with disc brakes and front suspension, where they can experience weight transfer and the front suspension compressing when braking.
Motorcycles and cycles could be part of the National Curriculum, within Physics, centre of mass, friction, tipping, leaning, speed, gyroscopes, kinetic energy, braking distances etc. I think it helps when you have a practical example of the theory.
Regarding the essential difference between cycles and motorbikes, it is simply speed, and mastering throttle control which is straight forward.
What is vital to grasp, and to be taught, is that momentum obeys a ‘Square Law’. So it takes 16 x further to stop from a motorbike’s 60 mph as it does from a bicycle’s 15 mph.
The major danger is young riders jumping on motorcycles of 125cc and above, which can get to 60mph or more, without any training.
These are what I believe are the common issues with ‘Advanced Training’ from the unqualified and unlicenced, and the charity sector observers and tutors exceeding their roles, trying to provide training not assessments, ignoring official riding advice and standards, thinking they know better.
The source is probably, at least in part, old police ‘pursuit’ and ’emergency response’ practises – usually on a marked bike but could also be unmarked surveillance:-
You will probably not receive any training to brake from high speed, so you need to master this before you go.
The key thing is not to snatch the front brake lever, so you need to continually practise so you automatically just squeeze it in an emergency with increasing pressure. Practice braking from higher speeds until it becomes automatic.
Use both brakes and cover the front brake with your two inside fingers when you can. This should reduce your reaction time by around 1 second – 88 feet at 60 mph. The difference between stopping and a 40 mph, probably fatal impact. Use a phone App such as iAccel Lite with care. The standard is 0.67 g average. I went though all my training and trainer training without anyone ever checking I could stop from high speed.
If you are presented with a two-way radio, walk away. This is in direct breach of DVSA standards. Radios should be one way only, for obvious safety reasons. The trainer would probably not have been trained in the correct instruction protocols to keep riders safe.
If you are shown the ‘suicide swoop’, which I have by an ex-police rider – overtaking an HGV on a LH bend – forget it. Unnecessary and very dangerous.
If you’re shown ‘off siding’ – taking a LH corner from the RH gutter – forget it as above. These are two old ‘pursuit’ techniques. Never cross the centre line except when overtaking, and don’t cut corners.
Be aware if you move out near the offside kerb to get a better view, you may not see RHS hazards, and emerging vehicles from your right will not be expecting you. You could also be in the blind zone of the vehicle in front, which could pull out.
If you’ve been pressurised into overtaking at every opportunity – don’t. You shouldn’t be in a hurry. Only overtake when you are absolutely certain there are no hazards.
Be very careful filtering. It’s not necessary and it’s hazardous. You may well be encouraged to do it at every opportunity. The training is usually to look for a gap ahead so you can get back in, but there’s no guarantee it will still be there when you get there, and you could be ‘hung out to dry’. Also, if there is a gap it’s often for another road user. This could be for a pedestrian to cross, a car to emerge etc. The gap is very unlikely to have been left for you.
When filtering, treat every vehicle you pass as a separate overtake, and make sure there is the space to slot back in, in front of them.
Only filter past stationary vehicles or vehicles travelling < 10 mph.
Don’t filter up the inside between the traffic and the kerb. Drivers and others won’t expect it, and gutters are often full of debris.
When filtering in between two lines of traffic, or when using a bus lane, be aware of hazards appearing from the RHS as well as the LHS.
Don’t filter right up to the front. If you’re in between two lanes the RH driver may not see you and you may get squeezed on take off. You might also get some competition at the ‘traffic light Grand Prix’ as you will probably need to get immediately ahead to stay safe. This can be very dangerous. Look out for sports cars and hot hatches – (and anyone with his cap on backwards). Stop in a space one car back from the front.
Be very careful filtering down the outside, particularly on narrow roads.
Don’t filter up front by using the RH turn lane unless you are sure that you can get back in. Don’t go straight ahead from the RH turn lane. Other road users will expect you to turn right, and if there’s a RH traffic light filter, you’ll be blocking the lane.
I’ve been deliberately pushed into oncoming traffic when filtering, in one case over a double white line by an irate driver who thought I should stay behind him. Got very close to an HGV coming the other way. The drivers had all moved over to give me room. The driver in question did the same until I appeared. He then seemed to realise why everyone was doing it. He then pulled back out just as I was almost next to his car. Many years ago we had a driver opening his car door in front of a group of us, standing in the road trying to stop us passing him.
The lesson is, even if you think a driver has moved over to let you past, you may be mistaken.
Many police riders appear to have been taught ‘pursuit’, are hugely experienced, but they have one other big advantage over the rest of us – a marked bike. From my experience they still ride the same way on a civilian bike when training the public, although it’s usually white, and they often wear a police hi viz jacket with chequered stripes.
Be very careful cornering. You may be following your trainer, and he could be going very quickly. He may be encouraging you to ride at the same pace, potentially taking you out of your comfort zone, leaving you very vulnerable to a panic induced crash.
You may be encouraged to routinely trail brake into corners using the front or rear brakes. If you have to brake into a corner then you have entered it too fast. It makes very little difference to your journey times, but increases your entry speed and uses up some of your safety margin. DVSA and Roadcraft advice is to brake before the corners for obvious safety reason. There is currently a widely publicised MCN video promoting front wheel trail braking into every corner by an ex-police rider from a well known training company. Ignore it.
If you have to brake into or mid corner, DVSA and Roadcraft advice is to carefully apply the rear brake only. This is difficult and risky to practise on the road. However, you can with care, and you can also make sure that your foot is ready. You can also make sure you are using the rear brake regularly as you are stopping normally. Some riders never use it.
Police riders have also done far more riding than almost all civilians, being on a bike most days, so are hugely experienced and have been very well and continuously trained over many years. They are used to riding at high speeds well above the speed limits. I’ve had a couple of ex-police riders come on the DVSA Enhanced Riders Scheme. They didn’t say they were ex-police, and were both surprised when I asked them when they left. They are easy to spot from their attitude and the way they ride – usually at circa 85 mph when they get the chance.
Passing on their knowledge tends to be difficult for many police riders and others. Most are handicapped as they’ve never been taught how to train and pass on their knowledge properly. We used to have a number of police track coaches at The School. Not now. They are trained to be unemotional, impersonal, remote and aloof, so have to overcome this. A large part of the DVSA post-test trainer’s course is how to train using a well-established modern teaching method known as ‘client centred learning’.
The ex-police and some civilian trainers will often check where the speed cameras will likely be before they plan your route. This info is publicly available from some forces, so they would not be overly concerned of being caught speeding. You should adhere to speed limits, so don’t be encouraged to speed.
You may be encouraged to ride on motorways and dual carriageways at 85mph next to the centre barrier. There are some good reasons for this, but be aware that cameras on motorways are far more common, some mobile sitting on the bridges. Stick to or close to the speed limit – probably an indicated 75. You are probably at least as safe on the inside lane at 60 mph with the hard shoulder as an escape route.
Never do anything that you feel is unsafe. Ever. Ride away.
(Please note this differs from official DVSA or Police Motorcycle Roadcraft advice – see below. There is no official advice I can find to cover your brakes, even in response to hazards, although this is taught by BikeAbility to young cyclists).
Summary
When Upright
The advice is to ride covering your brake and clutch by resting your index and middle fingers on the levers. In an emergency, if upright, squeeze both immediately, along with the rear brake.
The engine may be left screaming. It doesn’t matter.
If you aren’t covering your front brake, (or have an automatic or electric bike), then immediately apply the rear brake while you are shutting the throttle and reaching for the levers.
If the front tyre skids, release and reapply more gently. If the ABS activates, maintain the braking pressure, and only release the pressure if the rear wheel leaves the ground and you feel you might capsize.
This advice could save you around 1 second reducing your impact speed by around 15 mph.
You’ll probably survive a 30 mph impact, but not one at 40 mph, so scrubbing off as much speed as possible is crucial.
From 60 mph, it could be the difference between stopping in time, and a 40 mph impact. As always ‘it depends’.
Braking obeys a ‘Square Law’.
In many, if not most collisions, it is thought you have < 2secs to react and brake.
When Banked
If you have to brake on a bend, you have two options.
Apply the rear brake only.
Bring the bike upright and apply both brakes – if you have room.
Practise is vital to make your response automatic.
Introduction
Firstly, for drivers who are non-riders, this may all seem unnecessary and over complex. In other vehicles, drivers just instinctively stamp on the brakes. It requires no skill or thought. The vehicle will almost certainly have ABS and ‘yaw control’, so even on a bend or on a poor surface, it should simply come to a halt. The driver usually stays in control, or rather the vehicle does, with the driver held in place by a seatbelt and with a steering wheel for support. However, obviously the laws of physics still apply if you’re going way too fast.
Motorcycles have two separate brakes, one front, one back, operated separately like a bicycle. (Some have linked brakes). However the rear brake is usually foot operated. The centre of mass is lower, so they can brake more effectively than a cycle. But it is far higher than other road vehicles. This restricts the braking to <1g whereas cars etc can brake at >1g.
Motorcycles therefore suffer more from weight transfer under braking, with the rear tyre becoming more likely to skid during braking, as the weight transfers forwards onto the front tyre. ABS was only compulsory for bikes over 125cc from 2016, so small or older bikes are very likely to skid. A front wheel skid often results in a fall, but a rear skid doesn’t usually (as bicycles).
Under hard braking, the rear wheel can leave the ground, the bike can pitch forward and flip, and the rider can go over the handlebars. Some very modern bikes have pitch control. This works with the ABS to reduce the braking to prevent this. But usually it’s in the control of the rider, who at the time is experiencing similar forces to doing a ‘hand stand’.
So minimising braking distances in an emergency, unlike cars, requiries ‘muscle memory’ acquired though continual practise to prevent panicking and snatching the front brake; physical strength; a high degree of skill to modulate front and rear brake pressures; an accurate assessment of the likely grip available from the road surface.
This assumes the bike is upright. In a corner, using the front brake with the lower level of grip left after cornering forces, makes a skid far more likely. It also affects the steering, with ‘yaw’ potentially making the bike ‘sit up’ and run wide, and requires more lean angle. The rear brake doesn’t affect the steering, but is far less effective due to weight transfer
Advice
Firstly consider increasing your separation distance from 2 seconds to 3 seconds, as advised in Norway (which has a better safety record) and NSW in Australia.
This is also important as drivers often drive far too close behind riders, and the car in front can stop more quickly than you.
Bear in mind it’s usually ‘the unexpected’ that will get you, no matter how skilled and experienced you may be, or think you are.
Always consider covering your brakes, as a minimum in response to any potential hazard. Rest your index and middle fingers on top of the front brake lever. Have your foot ready over the rear brake pedal. Extend your left hand’s index and middle fingers and place on top of the clutch lever.
If you have to brake suddenly, roll your hand forward and release the throttle. Wrap your fingers around the lever and squeeze, don’t snatch the front brake lever, applying increasing pressure. If the wheel locks, immediately release and reapply more gently.
Press down steadily on the rear brake with increasing pressure, and again release and reapply more gently if the rear wheel locks. It will probably need to be gradually released as the weight transfers forwards and the grip reduces. Just initally dabbing the rear brake is an alternative, which needs less thought and skill.
You may not be able to fully close the throttle. If you can’t, pull in the clutch. The engine may be screaming, but it’s not important – stopping is.
The front brake is by far the most effective brake, so focus your attention on it, and your front wheel grip.
If the ABS comes on, keep the brakes applied and let the system bring you to a stop.
The machine will pitch forward alarmingly, the rear will lift and the forks will sink. You may find that your head nods forwards, and that you cannot see ahead (which might be a blessing).
Recommendations
These recommendations are based on basic theory and common sense, and minimising braking distances (Cossalter).
As a rider, if you think you will instinctively brake effectively in an emergency – please think again. You may be mistaken.
Forensic crash investigators have found that circa 50% of riders skid and fall trying to brake in an emergency.
Research has also found only 50% of riders can achieve Highway Code braking distances. But, with training and practice, many riders can stop in 80% of these distances. Braking effectively can easily be the difference between braking in time, and a serious impact.
You will likely be unaware of these figures, although the research is over a decade old. In some areas the police and others have been addressing the problem. Locally the Lincs police were running courses at Cadwell Park covering emergency braking with Hopp Rider Training. There are also other initiatives that we are aware of.
The problem has been hidden by the very poor accident investigation procedures used by the police. They will likely be aware of the problem due to the evidence at the scene where a rider has fallen and slid into a vehicle at ground level, and the scrape marks on the road. There is no specific cause of ‘fell whilst braking’. It’s swept up in ‘Loss of control’ which isn’t particularly helpful. In addition, the failure to brake properly will likely be hidden as it may be unknown.
So this cause will likely end up being reported as ‘speeding’ or ‘failed to look properly’. There are correct diagnoses of speeding, where the injuries the rider sustained show that the impact was at above the speed limit. But the figures are probably misleading, not helped by a recent survey using traffic cameras that motorcyclists are more likely to be speeding than other road users.
We are often seen as reckless, and our own worse enemies, with some justification.
It is clear that National and Local Government is not focussed on PTW safety. The decisions in continuing with hired E-Scooters despite 50 deaths, and over 500, maybe 1,000’s of serious injuries confirm this, and the official findings that they are 5 times more hazardous than a bicycle.
E-Scooters take twice as long to stop than any other vehicle, including bicycles. It’s braking yet again.
We’ll have to help ourselves.
Official Advice
None that I can find suggests riding normally covering the front brake – but I might have missed it.
Bikeability, who work with the Dft on cycle training, promote covering the brakes on a bicycle. So why not on a PTW? Makes no sense not to.
I know it’s considered by some to make snatching the brake more likely, so it may have been deliberately ignored. I have seen no evidence to support this. With modern ABS, snatching would make little difference, based on our recent tests with KurvX dataloggers.
Also the two fingers near the pivot applied first, make snatching and locking less likely.
DVSA
The current DVSA advice is to close the throttle. Then apply the front brake before the rear. This makes no sense. Applying the rear brake as you are closing the throttle turns on the brake light probably 1 second earlier. This can be a life saver. You’ve also started to brake, which makes an even bigger difference with linked brakes.
Applying the rear brake immediately reduces the reaction time by a second or more, potentially reducing impact speed by circa 10 mph, 20 mph with linked brakes (which should be compulsory).
ERS Extra Modules Taken
You can see from the above graph, from information just supplied by the DVSA, that ‘Effective Braking Techniques‘ is the most popular extra ERS module by a margin, which implies many riders are aware of their vulnerability in this respect.
The irony is that current training, (if compliant with DVSA advice), may increase the rider’s level of risk, and adversley affect outcomes
POLICE MOTORCYCLE ROADCRAFT
Closing the throttle first is missed (it was in the 1990’s DSA riding manuals as well). It may be obvious but could be forgotten in an emergency. It’s not like a car where you usually (not autos if you’re left foot braking) have to take your foot off the throttle to brake.
It’s also advised that you release the front brake and apply the rear as you’re coming to a halt. This looks to have been mistakenly carried across from normal braking, as it will likely increase braking distances, and at the point where the rate of deaccleration is at its greatest.
INSTITUTE OF ADVANCED MOTORCYCLISTS
The hand book I have is dated 2004, so the advice may have changed. It mentions having ‘your hand and foot poised over the control’, but again does not cover closing the throttle. This also does not appear under ‘What the examiner looks for’, which suggests emergency braking is not assessed.
The advice in a bend is to ‘sit the bike upand and brake hard‘, as opposed to police and DVSA advice to use the rear brake first. (We will be covering braking in corners in detail in another post).
This is a link to the IAM document ‘Full Control’, which includes advice on braking. It’s translated from Norwegian so somethings may have been lost in translation. I confirmed it’s the most recent version, but it’s from the 1980’s and doesn’t appear to include ABS.
All courses comply with DVSA and Roadcraft standards, so it’s not clear which method they now advise. However, RoSPA have published the advice below in ‘Care on the Road’.
Despite being a RoSPA Instructor and a DVSA Post-Test trainer, and completing BikeSafe, no one has checked that I can stop in an emergency since my licence test in 1967 at 28 mph.
The current official advice I think is wrong, which is likely to result in avoidable SKIs.
Emergency Straight-Line Braking
This assumes you have ignored the advice above, and are not covering the front brake.
If either wheel locks, release that brake immediately and reapply with less pressure.
If the rear wheel lifts off the ground, release some front brake pressure to stop the bike tipping forwards.
Disengage the clutch as you come to a halt
When banked in a corner, just carefully apply the rear brake.
Dry Roads – the advice is 10% rear brake and 90% front
Wet Roads – 30% rear and 70% front due to less grip.
(Vittore Cossalter – ‘Motorcycle Dynamics’)
Emergency Braking in a corner
(We intend to cover trail braking and braking mid corner in detail in a later post).
CORRECT TRAINING IS VITAL
Research has shown emergency braking competence is not related to rider experience. If riders are not taught properly, many will probably never be able brake properly, putting them at high risk.
Practice Using a Phone App
You can use a free phone App such as iAccel Lite to test your braking ability. It shows initial speed, distance to stop and average braking g force, which should be 0.67g minimum to meets Highway Code braking distances. The theoretical limit is 1g after which most bikes will start to tip up. The best riders can stop in 80% of the published distances.
(As few Android users took this advice last year, iAccel is currently only available on iPhones. We’re trying to address this).
PRACTISE USING A DATA LOGGER
These are graphs from a KurvX datalogger from a test day at Blyton Park. The Kurvx system or any data logger can also be also be used for cornering feedback and training.
This has the advantage of being able to see the braking force applied by the rider through the braking cycle, and where improvements can be made. You can see from the second graph that the rider failed to apply the brake hard enough initially.
Practise, Practise, Practise
If your bike doesn’t have ABS, do not practice alone due to the risk of falling.
It is vital that you practice emergency braking repeatedly to create the required ‘muscle memory’, so your response become automatic. This should avoid an uncontrolled panic reaction, which currently means circa 50% of riders in an emergency lock the front wheel, skid and fall.
Even with ABS, many riders can simply fail to apply the brakes firmly enough, usually due to previous or current experience on bicycles.
If the ABS activates, the rider has braked too hard, or more likely initially too harshly. There is no evidence that ABS actually minimises braking distances, although it is a vital safety aid.
If the ABS does activate, releasing and reapplying the brakes will probably increase the braking distance.
We’ve tested the latest ABS technology, and it’s far better than it was. You can brake with the tyres screaming.
It’s better that your technique doesn’t activate the ABS, as you may ride a bike without ABS in the future, and will need the skills.
Gradually build up, braking harder as your confidence grows, always ready to release the lever immediately if the front wheel locks. Once the forks have compressed, and the weight has transferred, which probably takes around a second, you can usually squeeze the lever as hard as you can without the wheel locking.
In theory it takes 200 repetitions, after which the memory and reaction becomes permanent and automatic. This is easier to achieve safely and quickly on a track.
As most of the speed is lost at the end of braking, the difference between the best and worst rider as tested, is the difference between stopping in time from 60 mph, or a 40 mph potentially fatal impact.
Most track riders and racers already have this built-in, as it only takes a day’s racing or a trackday for this to become embedded into the rider’s behaviour.
If you change your bike, consider practicing again, particularly if it is an older machine without ABS.
Wet, slippery roads, or a poor road surface.
Wet roads need more care. Apply the brakes initially more gently. Once the weight is transferred onto the front tyre, it is unlikely to skid unless there is standing water. Again, 70/30 front/rear braking is suggested.
Always take care, and keep within your capabilities and confidence limits.