
Basic Advice – ‘Four Fingers’.
(Please note this differs from official DVSA or Police Motorcycle Roadcraft advice – if in doubt refer to ‘Riding – The Essential Skills’ and follow that advice).
Consider riding with your foot over the rear brake pedal and two fingers resting on the front brake lever whenever you can. This potentially saves 1 second in applying the brakes, which can make a significant improvement in outcome during a crash. Bear in mind it’s usually ‘the unexpected’ that will get you.
Always consider covering your brakes in response to any potential hazard, by placing your index and middle finger on top of the front brake lever, resting your foot on the rear brake pedal. Extend your your left hand index and middle fingers on top of the clutch lever.
If you have to brake suddenly, roll your hand forward closing the throttle, wrapping your fingers around the lever and squeezing, don’t snatch, the front brake lever applying increasing pressure.
If the wheel locks, immediately release and reapply more gently. At the same time pull in the clutch and press down steadily on the rear brake with increasing pressure, and again release and reapply more gently if the rear wheel locks. It will need to be gradually released as the weight transfers forwards and the grip reduces. Just initally dabbing the rear brake is an alternative, which needs less thought still.
You may not be able to fully close the throttle, and the engine may be screaming, but it’s not important – stopping is.
The front brake is by far the most effective brake, so focus your attention on it and front wheel grip.
If the ABS comes on, keep the brakes applied and let the system bring you to a stop. Only release some pressure if the bike tips up violently and the rear wheel leaves the ground.
Braking hard from speed is similar to doing a handstand for a few seconds whilst adjusting the brake pressures, and steering, balancing, trying to keep the machine straight.
It needs practice.
Introduction
These recommendations are based on basic theory and common sense, and minimises braking distances (Cossalter).
As a rider, if you think you will instinctively brake effectively in an emergency – please think again. You may be mistaken.
Forensic crash investigators have found that circa 50% of riders skid and fall trying to brake in an emergency.
Research has also found only 50% of riders can achieve Highway Code braking distances. With training and practice, many riders can stop in 80% of these distances. Braking effectively can easily be the difference between braking in time, and a serious impact.
You will likely be unaware of these figures, although the research is over a decade old. In some areas the police and others have been addressing the problem. Locally the Lincs police were running courses at Cadwell Park covering emergency braking with Hopp Rider Training. There are also other initiatives that we are aware of.
The problem has been hidden by the inadequate accident investigation system used by the police. They will likely be aware of the problem due to the evidence at the scene where a rider has fallen and slid into a vehicles at ground level, and the scrape marks on the road. There is no specific cause of ‘fell whilst braking’. It’s swept up in ‘Loss of control’ which isn’t particularly helpful. In addition, the failure to brake properly will likely be hidden as it may be unknown.
So this cause will likely end up being misreported in addition as ‘speeding’ or ‘failed to look properly’. There are correct diagnoses of speeding, where the injuries the rider sustained show that the impact was at above the speed limit. But the figures are probably misleading, not helped by a recent survey using traffic cameras that motorcyclists are more likely to be speeding than other road users.
We are often seen as reckless, and our own worse enemies, with some justification.
It is clear that National and Local Government is not currently interested in PTW safety. The reckless stupidity in continuing with E-Scooters despite >50 deaths, and >1,000 serious injuries, and the official findings that they are 5 times more hazardous than a bicycle.
We’ll have to help ourselves.
Official Advice
None that I can find suggesting covering the front brake – but I might have missed it. I know it’s considered by some to make snatching the brake more likely, so it may have been deliberately ignored. I have seen no evidence to support this. With modern ABS it would make little difference, based on our recent tests with KurvX dataloggers.
DVSA
The current DVSA advice is to close the throttle. Then apply the front brake before the rear. This makes no sense. Applying the rear brake as you are closing the throttle turns on the brake light probably 1 second earlier. This can be a life saver, as riders are very vulnerable to being struck from behind. You’ve also started to brake, which makes an even bigger difference with linked brakes.
POLICE MOTORCYCLE ROADCRAFT
Closing the throttle first is missed (it was in the 1990’s DSA riding manuals as well). It’s advised that you release the front brake and apply the rear as you’re coming to a halt. This looks to have been mistakenly carried across from normal braking.
Emergency Straight-Line Braking
This assumes you have ignored the advice above, and are not covering the front brake.

- If either wheel locks, release that brake immediately and reapply with less pressure.
- If the rear wheel lifts off the ground, release some front brake pressure to stop the bike tipping forwards.
- Disengage the clutch as you come to a halt
- When banked in a corner, just carefully apply the rear brake.
Dry Roads – the advice is 10% rear brake and 90% front
Wet Roads – 30% rear and 70% front due to less grip.
(Vittore Cossalter – ‘Motorcycle Dynamics’)
Emergency Braking in a corner

Be Prepared
You should consider rolling off the throttle at any time in response to hazards. Cover the front brake with your index and middle finger. This will reduce your reaction time and braking distance significantly. You can then apply both brakes at the same time.
Riders of classic bikes with cable brakes should be aware of the risk of their little finger and ring finger getting trapped between the lever and the bar. This can happen due to cable stretch. So they should use all 4 fingers. Riders need to check there is clearance on all machines so their outside fingers won’t get trapped by the lever.
This could save circa a second or more in front brake reaction time in an emergency. It makes locking the front wheel less likely, as the rider starts with two fingers near the pivot. They can then be joined after by two more fingers further away, which can offer more power if needed.
Consider lightly touching the rear brake to operate your rear brake light if there is another road users close behind in hazardous situations. Watch the front wheel of cars at junctions for the first sign of them pulling out in front of you.
Consider riding while cruising with two fingers (index and middle) resting on top of the front brake lever. This lets you apply it quickly if needed. You will also close partially at least the throttle as you stretch your fingers forward to grasp the lever (not automatics without a clutch).
However, dependent on the design, it can make it difficult to fully shut the throttle. Pulling in the clutch smartly will ensure it doesn’t affect braking. Yet, it could leave the engine racing.
This should significantly shortens braking distances as the front brake is applied immediately. However, if you haven’t practiced, the front brake might be snatched. This needs to be balanced against stopping far more quickly.
Research has shown emergency braking competence is not related to rider experience. If riders are not taught properly, many will probably never be able brake properly, putting them at high risk.
Practise Using a Phone App
You can use a free phone App such as iAccel Lite to test your braking ability. It shows initial speed, distance to stop and average braking g force, which should be 0.67g minimum to meets Highway Code braking distances. The theoretical limit is 1g after which most bikes will start to tip up. The best riders can stop in 80% of the published distances.
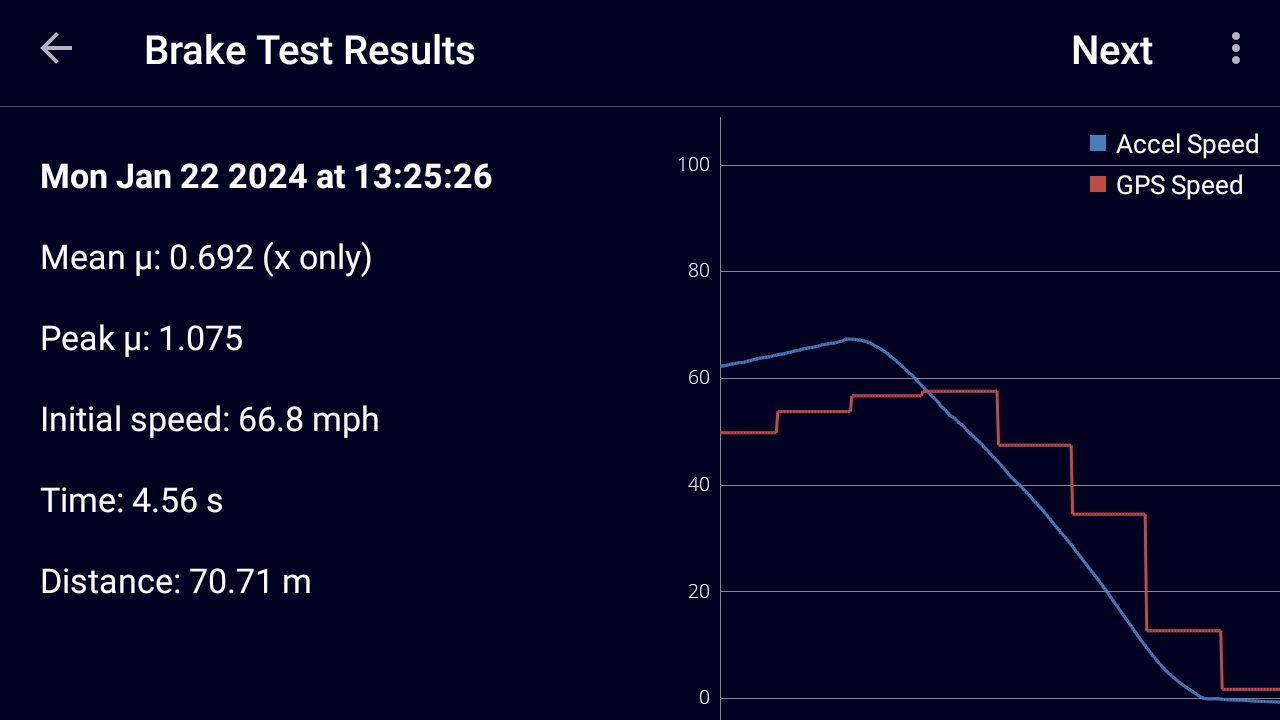
PRACTISE USING A DATA LOGGER
These are graphs from a KurvX datalogger from a test day at Blyton Park. The Kurvx system can also be used for cornering feedback and training.


This has the advantage of being able to see the braking force applied by the rider through the braking cycle, and where improvements can be made. You can see from the second graph that the rider failed to apply the brake hard enough initially.
Practise, Practise, Practise
If your bike doesn’t have ABS, do not practice alone due to the risk of falling.
It is vital that you practice emergency braking repeatedly to create the required ‘muscle memory’, so your response become automatic. This should avoid an uncontrolled panic reaction, which currently means circa 50% of riders in an emergency lock the front wheel , skid and fall.
Even with ABS, many riders can simply fail to apply the brakes firmly enough, usually due to previous or current experience on bicycles.
If the ABS activates, the rider has braked too hard, or more likely initially too harshly. There is no evidence that ABS actually minimises braking distances, although it is a vital safety aid.
If the ABS does activate, releasing and reapplying the brakes will probably increase the braking distance.
We’ve tested the latest ABS technology, and it’s far better than it was. You can brake with the tyres screaming. But it’s better that your technique doesn’t activate it. You may ride a bike without ABS in the future, and will need the skills.
Gradually build up, braking harder as your confidence grows, always ready to release the lever immediately if the front wheel locks. Once the forks have compressed, and the weight has transferred, which probably takes around a second, you can usually squeeze the lever as hard as you can without the wheel locking.
In theory it takes 200 repetitions, after which the memory and reaction becomes permanent and automatic. This is easier to achieve safely and quickly on a track.
As most of the speed is lost at the end of braking, the difference between the best and worst rider as tested, is the difference between stopping in time from 60 mph, or a 40 mph potentially fatal impact.
Most track riders and racers already have this built-in, as it only takes a day’s racing or a trackday for this to become embedded into the rider’s behaviour.
If you change your bike, consider practicing again, particularly if it is an older machine without ABS.
Why this sequence?
It’s important to brake as quickly and hard as possible to avoid collisions or minimise impact speeds.
The rear brake should be applied first (or together with the front brake if you can). This is because the rider’s foot is usually positioned directly above the rear brake pedal. The foot can also be slid forward and down in a single movement.
This operates the brake light immediately while the throttle is being closed.
Applying the rear brake also compresses the rear suspension, lowering the centre of mass. This will allow the front brake to be more effective. What limits a motorcycle stopping is it will tip up.
The rear brake usually only provides only around 40% of braking. It’s important to apply the front brake as soon as you can.
The rear brake starts the braking process right away. It also initiates the crucial weight transfer onto the front tyre. This maximizes the braking. This makes locking the front wheel less likely. It also squats the machine down, lowering the centre of mass which also helps.
On bikes with linked brakes, this also activates the front brake, giving you circa 70% of the available braking.
The front brake initially provides about 60% of braking. This can increase to 100% as the weight transfers forwards.
The best ration of front to back braking is probably circa 90/10 for most machines. This keeps the bike lower, allowing it to stop more quickly. 70/30 in the wet as there is less grip.
Applying the rear brake first means the bike is already slowing as the rider reaches for the front brake lever. This probably takes circa 0.5 seconds = 44 feet at 60 mph.
The rider should be prepared to immediately release the rear brake if the rear wheel locks. This is not vital unless the machine slews to the side. The situation differs with linked brakes and the style of machine. Notably, cruisers have a more effective rear brake. However, the basic advice is the same for all types of motorcycles.
At the same time, the rider needs to sit up and release the throttle. They should extend their fingers and grasp the front brake lever. Next, they must straighten their arms. Then, apply steadily increasing pressure to the front brake lever. This action transfers more weight forward onto the front tyre. It is crucial to do this without losing front wheel traction. This requires a high degree of skill and practice.
Riders need to be prepared to immediately release and reapply the front brake if the wheel locks. This is usually caused by snatching. Riders need to release some front brake lever pressure if the rear wheel leaves the ground. This can happen particularly as the vehicle comes to a halt. This also requires skill and practice to recognise and respond to.
Wet Roads
Wet roads need more care. Apply the brakes initially more gently. Once the weight is transferred onto the front tyre, it is unlikely to skid unless there is standing water. Again, 70/30 front/rear braking is suggested.
Braking Mid Corner
Firstly, the advice, if you believe you may need to brake mid-corner in response to a hazard usually caused by too high an entry speed or a tightening corner, is to simply look around the corner where you want to go, rather than where you feel you might end up.
You should counter-steer instinctively, but can also counter-steer deliberately with practice, pushing on the inside bar. The bike initially falls in the opposite direction to which the steering is turned, helped by the gyroscopic effects of the front wheel, after which the rider will instinctively turn the bars back to stop the machine falling further.
A modern machine with good tyres and ground clearance (not cruisers), can be banked at circa 45 degrees or more on reasonable road tarmac. Many crashes have been caused locally, the Lincs police informed me, on corners when the rider could have got around easily had they had the confidence. If you’re not confident leaning the bike, then get some on-track training where you can practice in relative safety.
Providing the bike is not banked at an extreme angle, there is a surprisingly large amount of grip still available for cornering, braking (or accelerating), or cornering when the motorcycle is banked, which is the combined dark dark and light green area, and the dark green areas respectively, as shown in the diagram below.
This is based on ‘Mohr’s Circle’ theory of grip, and is the theoretical maximum amount of grip. This is affected heavily by a variety of factors, particularly the distribution of weight under braking.
This is based on the 60 degree maximum lean angle that racers can achieve on slick tyres. 45 degrees is a sensible maximum on the road = 1g, in perfect conditions.

Braking mid-corner using the rear or front brake lightly (not both together) could be practiced with great care, for use in an emergency.
Rear Brake
It needs to be applied very carefully, as the weight is transferred off the rear tyre onto the front, so has a double negative effect on the level of grip.
However, the rear brake increases the ability for the bike to turn as weight is transferred onto the front tyre, which is doing the steering. The bike slows, squats and pitches slightly forward, sharpening the steering angle marginally, The rear tyre is likely to slip sideways, which is an old race bike trick for quicker cornering. This is like ‘oversteer’ in a car.
Worse case the rear loses traction and the rider may fall, but it’s usually a ‘low side’, unless the rider releases the brake fully after a wide skid, when a ‘high side’ is possible. But the outcome is probably better than a front wheel skid, as the machine will likely impact first, then the rider, rather than the rider being followed and struck by the machine.
The other alternative of a direct head-on collision with an oncoming vehicle, or stationary hazard, is likely to lead to a worse outcome.
Front Brake
Riders can ‘pick the bike up’ and brake if there is sufficient room and road width, but this tends to be a ‘last resort’. This is often a panic response. This results from the machine being steered more tightly into the corner, which has the opposite effect from counter-steering. Or from applying the front brake when banked, as this pushes the bike outwards (yaw).
Riders can apply the front brake lightly very lightly mid-corner in an emergency. It is potentially more effective than the rear, as most machines are designed with a slight front wheel weight bias. However, it affects the steering, straightening it, potentially ‘sits the bike up’ which can make the bike run wide, which can be more risky. The rider will need to push on the inside bar at the same time, counter-steering to stop the bike running wide. This increases the lean angle so uses up even more grip.
It is an opposite situation from the rear brake. The more front brake, the greater the grip as the weight is transferred forwards, but it needs a very smooth application.
Using the front brake in corners needs very careful training and practice, so is probably best left to professional trainers on a race track, with training and advice to road riders restricted to just looking where you want to go, avoiding ‘target fixation’, counter-steering and applying the rear brake mid-corner in an emergency.
Using the front brake carefully in a corner has potentially the greatest effect, but requires a high degree of skill and practise.
Most racers just use the front brake, but they plan ahead, knowing the bike will understeer and run wide at the limits of adhesion, which is not sensible on the road where you need a safety margin.
Trail Braking
Additional training in ‘trail braking’ into corners in an emergency could be of considerable benefit to riders, which we cover at The School. But it’s an advanced riding ‘failure to plan ahead’.
Racers consistently trail the front brake into many corners. They gradually release the front brake pressure as their lean angle increases, with the brake being finally released sometimes just as the throttle is opened on corner exit.
This leaves virtually no safety margin. It is totally unsuitable for road riders to use as a routine. But it is a useful tool to have in an emergency. This allows the rider to brake hard and turn at the same time. This is particularly useful when a rider has misjudged their entry speed to a corner. Or has to avoid a hazard.
The difference between carrying the front brake into a corner and applying the front brake mid-corner needs to be completely understood. It is crucial to distinguish between these situations. When you enter the corner with the front brake applied, the extra weight is already transferred onto the front tyre, so it already has the ability to produce significantly more grip.
Re-applying the front brake after you have started to turn, leaves the rider with initially only circa 50% of the weight on the front tyre, which is also doing the steering, making a skid and fall far more likely without great care and very careful application of the front brake.
Again, if in any doubt, it is recommended road riders should just use the rear brake when banked.
Always take care, and keep within your capabilities and confidence limits.
For more background information see:-
Feedback and opinions are welcomed.
Mike Abbott MBA, RoADAR (Dip), DVSA RPMT 800699, ACU Road Race Coach #62210
British Superbike School
Applewood
Old Hall Lane,
East Markham,
Newark
Notts NG22 ORF
Tel: 01777 818013
Mbl: 07939 041606
Web: www.britishsuperbikeschool.co.uk
May 2024
